
I used to want to call my coach Dianne Holum "Frank" because she spoke the truth and never sugar-coated. In fact, she was so brutally honest she would inflict blunt-force trauma on my ego because she always used me in front of the class to show everybody else what NOT to do.
For example, one time after berating me to stop collapsing on my left skate, I went to her and suggested there was something wrong with my frame placement, and was that the source of my problem? Hah! Dianne whistled everybody to a stop right then and there and gave me a public upbraiding.
"Stop blaming your equipment, your dog, or what you ate for breakfast for your skating problems," she said in a voice that went right through my very heart. "The problem isn't with anything that you can't control, the problem with your skating is YOU, and the root of all your skating problems is YOUR BAD BALANCE."
She turned to me and said "Eddy, if you want to be a good skater, you have to bring your weak side up to the level of your good side before you can make progress. You need better body alignment over your left skate. This means bringing your left knee together better and setting it down under your body more so that you don't have to go looking for your balance after finishing your right push. Keep your knees together as you push, don't separate early and set down outside your center of mass like most skaters."
That was a tall order for a fledgling skater. Some of it made sense but most sounded like highfalutin theory that I still couldn't see in my mind's eye. But Dianne had a touch of compassion too. She suggested I work on two specific rolling balance drills -- on my own time -- until I was ready to start putting everything back in motion again.
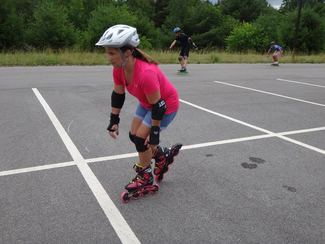
1. Base position glide. With knees together and sitting in the air-chair position, glide on one skate along a straight path with the other skate held up with the shin bone nearly parallel to the ground. You can do this while out cruising on your normal skate, just get on one skate and hit the pause button! Dianne called this the "ampersand" position (look at the Shift-7 on your keyboard and see how it resembles a gliding skater)
I usually get up to speed and then start my glide (easier) and try to hold it until nearly coming to a stop (difficult at slow speeds). Try to lock on to your balance and resist swimming (flailing the arms or using them like a balance bar on a tightrope). The only adjustments you should make are with your hips. Scoot your booty out over the outside edge of your gliding skate. By adjusting your back-end real estate, you will find your balance sweet-spot, where you can release all tension. If it's too hard to do on one skate, use the toe wheel of your rear skate as a training wheel.
The ampersand is so crucial because it is the position from which every push starts. It cannot be rushed. You can't fall into it due to lack of balance and expect a good push. If you can be composed and balanced each time, you will maximize your speed from your previous push and start the next one with everything behind it.
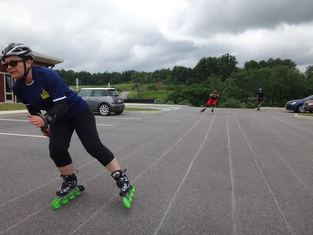
2. Nose-knees-toes triangle glide. Glide with one leg bent and one leg extended laterally with skate off the ground. This is the landing position after pushing, and for balance practice you can roll with two skates on the ground first, get your body in position, and then lift the extended skate. Try to hold this position for the length of a football field! If it's too difficult to do coasting on one skate, use the heel wheel of the extended skate as a training wheel. Again, rather than moving your body or arms to find balance, make the adjustments with your rear end by loosening up your hips, sitting into it and relaxing!
Good luck mastering these glides while out on your rolls. The more time you spend getting the hang of these without having to fire off all kinds of secondary stabilizer muscles, the more balanced and composed and efficient your skating will become. All the energy savings will add up to more fun at the race!
Next week I will tell you how to get from the base position to the nose-knees toes triangle and back again. Then you'll be putting it all together like shooby dooby doo wop!
For example, one time after berating me to stop collapsing on my left skate, I went to her and suggested there was something wrong with my frame placement, and was that the source of my problem? Hah! Dianne whistled everybody to a stop right then and there and gave me a public upbraiding.
"Stop blaming your equipment, your dog, or what you ate for breakfast for your skating problems," she said in a voice that went right through my very heart. "The problem isn't with anything that you can't control, the problem with your skating is YOU, and the root of all your skating problems is YOUR BAD BALANCE."
She turned to me and said "Eddy, if you want to be a good skater, you have to bring your weak side up to the level of your good side before you can make progress. You need better body alignment over your left skate. This means bringing your left knee together better and setting it down under your body more so that you don't have to go looking for your balance after finishing your right push. Keep your knees together as you push, don't separate early and set down outside your center of mass like most skaters."
That was a tall order for a fledgling skater. Some of it made sense but most sounded like highfalutin theory that I still couldn't see in my mind's eye. But Dianne had a touch of compassion too. She suggested I work on two specific rolling balance drills -- on my own time -- until I was ready to start putting everything back in motion again.
1. Base position glide. With knees together and sitting in the air-chair position, glide on one skate along a straight path with the other skate held up with the shin bone nearly parallel to the ground. You can do this while out cruising on your normal skate, just get on one skate and hit the pause button! Dianne called this the "ampersand" position (look at the Shift-7 on your keyboard and see how it resembles a gliding skater)
I usually get up to speed and then start my glide (easier) and try to hold it until nearly coming to a stop (difficult at slow speeds). Try to lock on to your balance and resist swimming (flailing the arms or using them like a balance bar on a tightrope). The only adjustments you should make are with your hips. Scoot your booty out over the outside edge of your gliding skate. By adjusting your back-end real estate, you will find your balance sweet-spot, where you can release all tension. If it's too hard to do on one skate, use the toe wheel of your rear skate as a training wheel.
The ampersand is so crucial because it is the position from which every push starts. It cannot be rushed. You can't fall into it due to lack of balance and expect a good push. If you can be composed and balanced each time, you will maximize your speed from your previous push and start the next one with everything behind it.
2. Nose-knees-toes triangle glide. Glide with one leg bent and one leg extended laterally with skate off the ground. This is the landing position after pushing, and for balance practice you can roll with two skates on the ground first, get your body in position, and then lift the extended skate. Try to hold this position for the length of a football field! If it's too difficult to do coasting on one skate, use the heel wheel of the extended skate as a training wheel. Again, rather than moving your body or arms to find balance, make the adjustments with your rear end by loosening up your hips, sitting into it and relaxing!
Good luck mastering these glides while out on your rolls. The more time you spend getting the hang of these without having to fire off all kinds of secondary stabilizer muscles, the more balanced and composed and efficient your skating will become. All the energy savings will add up to more fun at the race!
Next week I will tell you how to get from the base position to the nose-knees toes triangle and back again. Then you'll be putting it all together like shooby dooby doo wop!
 RSS Feed
